Here are the instructions to make your own Kombucha
Step 1 You need a bottle of brew. Check your little co-op or hfs, because not all of them complied with the recall. They may still carry a local brand. If that’s a no-go I’d hit up Craigslist. You may be able to score a bottle or better yet, a SCOBY (in which case skip to step 6). If worse comes to worst, there’s always the infinite Internet – I’m sure you can rustle something up.
Step 2 Gather your supplies. You’ll need: a bottle of raw, unpasteurized, 100% kombucha (no fruit juice added), 2 bags of caffeinated tea (green or black), 1 tablespoon sugar, a big glass bowl, a small rag or wash cloth, and a large rubber band. Remember cleanliness is key! Everything double washed, including hands.
Step 3 Place the tea bags and sugar into the glass bowl. Add 2 cups of boiling water, stir, and allow to steep until the water has cooled, about 20-40 minutes.
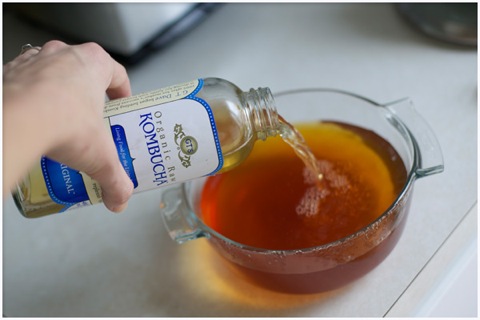
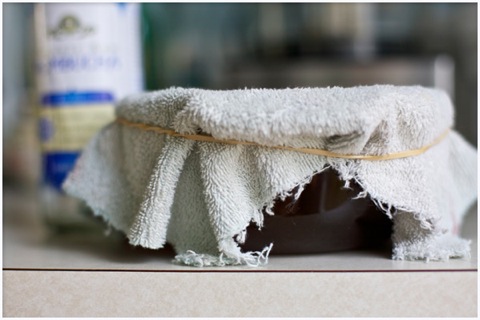
Step 4 Remove the tea bags and add the entire bottle of store-bought kombucha. Cover with the rag and secure with the rubber band.
Step 5 Put the bowl in a warm dry place (like atop the fridge) and just forget about it for 2 whole weeks. No fussing or peeking, or you might expose it to germs. Just pretend it’s not there!

TWO WEEKS LATER
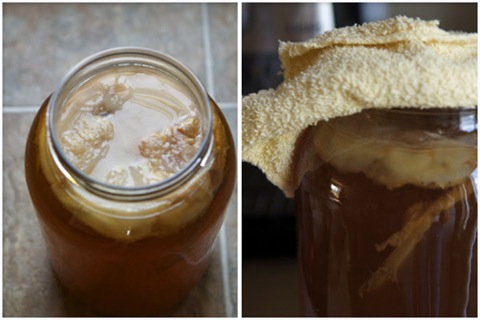
Oh hello, what the eff is that snotty looking thing?
Congratulations! That’s your SCOBY, which stands for ‘symbiotic colony of bacteria and yeast’. The SCOBY is like the love-child of an affair between acetic acid bacteria and yeasts. Basically, it’s like vinegar and beer made a baby. And now that you have it, you’re ready to brew your own kombucha!
Step 6 If you’re not ready to brew yet, store your SCOBY in it’s liquid in the fridge, in a glass jar with a plastic lid. No metal! When you’re ready to brew, gather: your SCOBY plus its liquid, 4-6 bags of caffeinated tea (green or black), 1-2 cups sugar (depending on how sweet you like it), a large glass jar with a wide mouth (a standard 1-gallon pickling jar is best), a clean rag or wash cloth, a large rubber band, a soup/stock pot, and a big metal spoon. Emphasis on cleanliness! Everything double washed, including hands.
Step 7 Fill your brewing container with water, then pour that water into your pot. Bring it to a boil and continue boiling for 10 minutes. Remove from heat and stir in 1-2 cups of sugar/evaporated cane juice. Add the tea bags, cover, and allow to steep and cool for a few hours.
Step 8 When the tea has returned to room temperature, transfer it to your brewing container. Wash your hands and then carefully transfer your SCOBY into the brewing container. Try to keep it ‘smooth side’ up. It may sink or it may float; either way is fine. Top off with the ‘starter tea’ that the SCOBY was stored in.
Step 9 Cover the brewing container with the rag/wash cloth and secure it with the rubber band. Allow the kombucha to ferment for 10-25 days in a warm dry place, out of sunlight – a kitchen cabinet or hall closet is good.
The stronger the tea you used, the quicker/stronger it will ferment. The longer you leave it, the quicker/stronger it will ferment. The warmer it is, the quicker/stronger it ferments. The longer it ferments the less sweet it becomes.
Step 10 When you’re done brewing remove the SCOBY to store in a jar with some starter tea. It will have created a ‘baby’, so now you can brew two batches (stagger them so you never run out), if you want. Your SCOBY will keep indefinitely in the fridge. The kombucha itself can be transferred to smaller bottles for easy storage and to free up the brew container for the next batch. The kombucha will keep in the fridge for up to 6 weeks.
Kombucha is a peculiar, X-Filesesque elixir of awesome. With its magical properties and super probiotic power, it’s an excellent addition to overall health and well-being. So get down with the DIY, and happy brewing!